Requests: Difference between revisions
No edit summary |
No edit summary Tag: Manual revert |
||
| (24 intermediate revisions by 5 users not shown) | |||
| Line 52: | Line 52: | ||
<!--T:3--> | |||
==Request Lifespan== | |||
<div style="float:right; margin: 0px 0px 0px 0px"> | <div style="float:right; margin: 0px 0px 0px 0px"> | ||
<graphviz border='frame' format='svg'> | <graphviz border='frame' format='svg'> | ||
| Line 100: | Line 101: | ||
<!--T:7--> | <!--T:7--> | ||
During the lifespan of a request, it is available to the laboratory technicians, except for the validation, which can only be done by a laboratory supervisor. | During the lifespan of a request, it is available to all the laboratory technicians, except for the validation, which can only be done by a laboratory supervisor or a specially authorized laboratory technician. | ||
<!--T:8--> | |||
==Create== | |||
[[File:Selectpatient1.PNG|350px|right|thumb|Create request form]] | [[File:Selectpatient1.PNG|350px|right|thumb|Create request form]] | ||
| Line 118: | Line 120: | ||
At any moment, the ''Save values'' button cannot be used if any of the required fields is not filled in. | At any moment, the ''Save values'' button cannot be used if any of the required fields is not filled in. | ||
<!--T:11--> | |||
==Change information== | |||
[[File:SearchRequest.PNG|350px|right|thumb|Change information form]] | [[File:SearchRequest.PNG|350px|right|thumb|Change information form]] | ||
| Line 125: | Line 128: | ||
Clicking on any part of the row will bring the laboratory technician to a form similar to the [[#Create|create]] one, with all of its tabs and similar format and behavior. | Clicking on any part of the row will bring the laboratory technician to a form similar to the [[#Create|create]] one, with all of its tabs and similar format and behavior. | ||
<!--T:13--> | |||
==Deliver samples== | |||
Similarly to the previous form, this also displays a list of either ''Registered'' or ''Processing'' requests, for the laboratory technician to choose one of them. | Similarly to the previous form, this also displays a list of either ''Registered'' or ''Processing'' requests, for the laboratory technician to choose one of them. | ||
[[File:DeliverSamples1.PNG|350px|right|thumb|Deliver samples form]] | [[File:DeliverSamples1.PNG|350px|right|thumb|Deliver samples form]] | ||
| Line 139: | Line 143: | ||
It is important to notice that the tests associated to the request cannot be changed once the first sample as been delivered. | It is important to notice that the tests associated to the request cannot be changed once the first sample as been delivered. | ||
<!--T:16--> | |||
==Introduce results== | |||
As in the previous cases, a list of requests is shown. | As in the previous cases, a list of requests is shown. | ||
In this case, this list contains all requests in ''Processing'' state. | In this case, this list contains all requests in ''Processing'' state. | ||
Clicking the corresponding button at the bottom, it is possible to download a | Clicking the corresponding button at the bottom, it is possible to download a worklist with all pending tests in these requests, to work on them off-line. | ||
<!--T:17--> | <!--T:17--> | ||
| Line 170: | Line 175: | ||
<!--T:21--> | <!--T:21--> | ||
On the laboratory technician accessing the details of the test, we gain access to visualize many other things (i.e., units of the result, inferior reference measure, superior reference measure, the user who introduced the results, as well as details provided for the corresponding sample on delivering it). | On the laboratory technician accessing the details of the test, we gain access to visualize many other things (i.e., units of the result, inferior reference measure, superior reference measure, the user who introduced the results, as well as details provided for the corresponding sample on delivering it). | ||
Moreover, this also allows changing if the test is automatic or deferred, indicate some incidence on the sample, or provide some note. | Moreover, this also allows changing if the test is automatic or deferred, indicate some incidence on the sample, or provide some note (notice that the content of this note will be visible to the patient in the report of the request). | ||
It is important to notice that any of the information provided in this form will not be persisted in the disk until back in the list and saved from there. | It is important to notice that any of the information provided in this form will not be persisted in the disk until back in the list and saved from there. | ||
| Line 176: | Line 181: | ||
If the result of the test was provided automatically (which is not enabled by default and only available in the context of the [http://dl-prod.essi.upc.edu/IMAGINGwiki/index.php/Main_Page IMAGING project]), the corresponding image and its associated note will be shown at the bottom of the details of the test. | If the result of the test was provided automatically (which is not enabled by default and only available in the context of the [http://dl-prod.essi.upc.edu/IMAGINGwiki/index.php/Main_Page IMAGING project]), the corresponding image and its associated note will be shown at the bottom of the details of the test. | ||
<!--T:23--> | |||
==Validate results== | |||
[[File:Validateresults.mp4|left]] | [[File:Validateresults.mp4|left]] | ||
This functionality, available only to the laboratory supervisor, uses exactly the same interface as introducing results, but the table shows one more column, ''Validated'', with a checkbox for each test. | This functionality, available only to the laboratory supervisor or a laboratory technician authorized to validate, uses exactly the same interface as introducing results, but the table shows one more column, ''Validated'', with a checkbox for each test. | ||
These can be checked one by one, or all at once, by choosing a concrete group of tests in the | These can be checked one by one, or all at once, by choosing a concrete group of tests in the dropbox at the top. | ||
On doing the latter, a button to check all the tests of the group will appear. | On doing the latter, a button to check all the tests of the group will appear. | ||
| Line 189: | Line 195: | ||
It is important to notice that the tests will not be really validated until the bottom right button is pressed to save the changes. | It is important to notice that the tests will not be really validated until the bottom right button is pressed to save the changes. | ||
<!--T:26--> | |||
==Search historic== | |||
[[File:Download.mp4|left]] | [[File:Download.mp4|left]] | ||
This functionality, available to both laboratory technician and supervisor allows to see any request in the history of the laboratory. | This functionality, available to both laboratory technician and supervisor allows to see any request in the history of the laboratory. | ||
| Line 200: | Line 207: | ||
The checkboxes in the [[System administration#Downloaded fields|Downloaded fields]] tab indicate which fields will be included in each of these files. | The checkboxes in the [[System administration#Downloaded fields|Downloaded fields]] tab indicate which fields will be included in each of these files. | ||
Moreover, the ZIP file is password protected. | Moreover, the ZIP file is password protected. | ||
The password used is indicated by the system parameter ''zip_password'', whose value can be seen and modified from [[System administration#Parameters|Parameters]] tab. | The password used is indicated by the system parameter ''zip_password'', whose value can be seen and modified from [[System administration#Parameters|Parameters]] tab. | ||
Additionally, the field separator and decimal characters used in the CSV file can also be configured in the same tab. | |||
</translate> | </translate> | ||
Latest revision as of 08:39, 7 May 2025
Requests are the most important entities in ARIS, whose main purpose is to manage them. They are always associated to a given patient, who must have been created before hand.

Request Lifespan[edit]

During their lifespan, requests go through some different states that determine the functionalities offered for them in the system. These states are depicted in the diagram, and their labels are modifaiable and configurable at State of the request.
On creation, the state of the request is Registered, and allows to provide the basic information, as well as associate different tests to it. After indicating that some of the samples have been delivered, the state changes to Processing and the data of the request cannot be modified anymore. Other samples can be delivered later, but at this point, results can be provided for the tests whose sample was already delivered. Once all non-cancelled tests have a result, the state of the request changes to WithResults. At this state, results can still be modified, but they are expected to be eventually validated. A request with all its non-cancelled tests being validated is considered Validated.
At any time, a request, its samples or its tests can be cancelled. A sample with all its tests cancelled is considered cancelled, and a request with all samples cancelled is considered cancelled, too.
During the lifespan of a request, it is available to all the laboratory technicians, except for the validation, which can only be done by a laboratory supervisor or a specially authorized laboratory technician.
Create[edit]
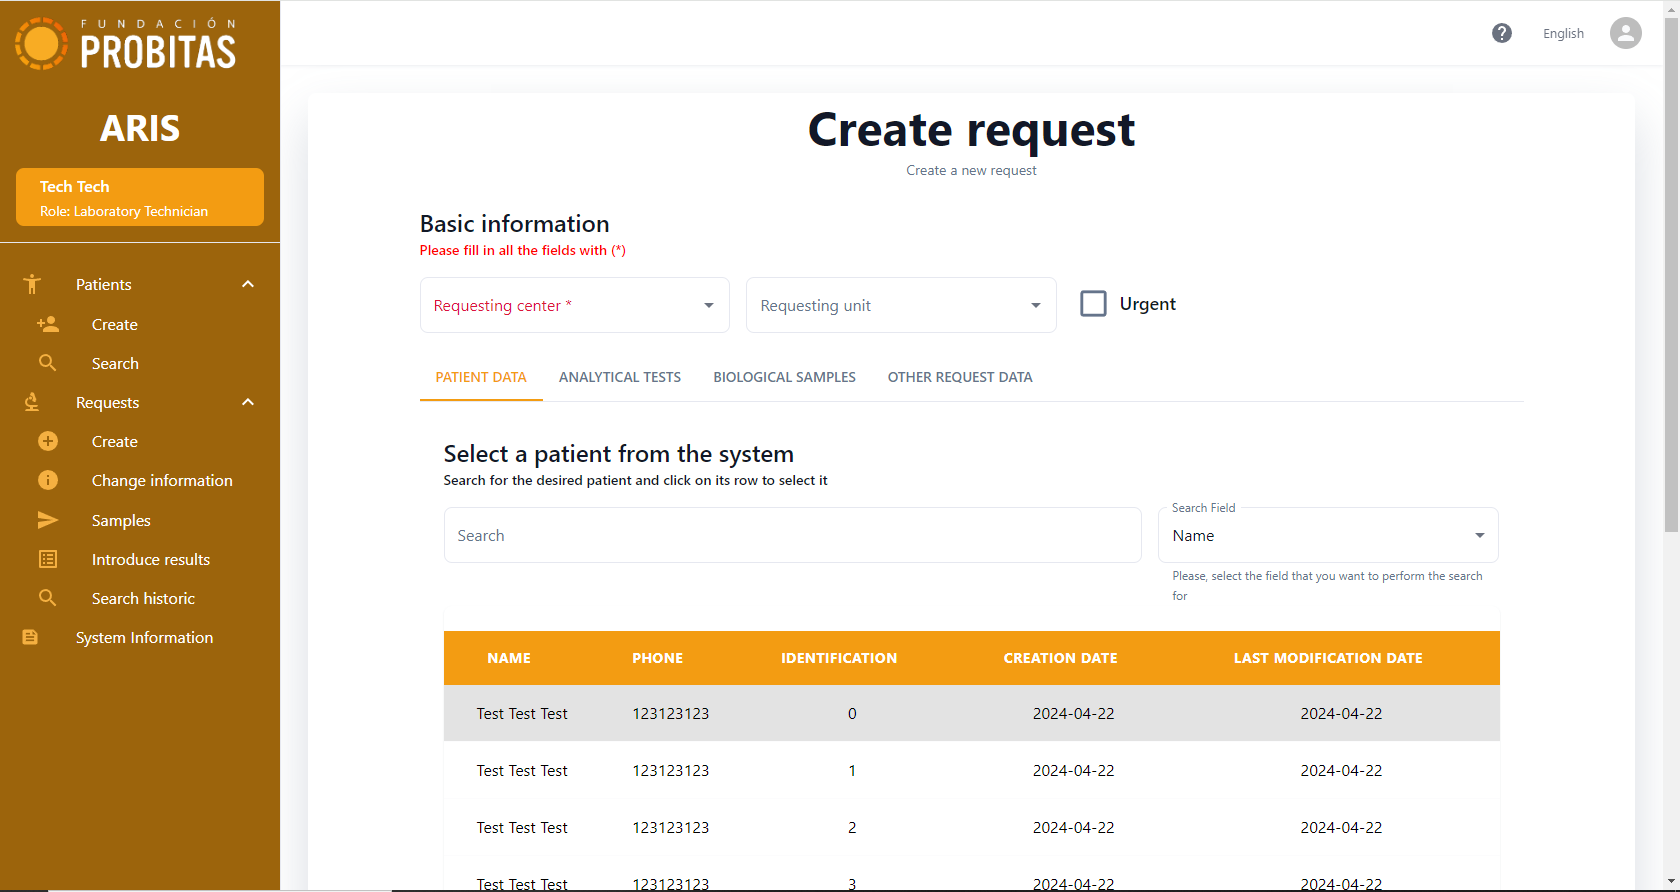
This form is divided into tabs. The tab the laboratory technician is on is indicated by the label of the tab turning orange. Above, it can be found the Requesting centre mandatory field, alongside with the additional Requesting unit field and the Urgent checkbox. To create a request, the following steps must be executed:
- Select a patient → The first tab involves searching and selecting a patient. The search grid can be narrowed down with the search field. Once a patient is selected, the main and important information about this patient will be displayed at the bottom of the form in a table. Until the patient has been selected, the laboratory technician cannot save the new request.
- Analytical tests → In this tab, the laboratory technician must choose which tests are requested and required for the patient. Groups and profiles will appear in case the proper parameter is enabled. More than one element from each list may be chosen, but at least one test must be requested one way or another. Tests selected as part of a group or profile (highlighted in purple) cannot be deselected individually.
- Biological samples → This tab informs the laboratory technician of the type of sample that must be taken, depending on the tests chosen in the previous tab. There are no required fields in this tab, but if the laboratory technician wants to add a comment, there is a comment box for each sample.
- Basic information → In this tab, other optional fields are provided like physician, the room or bed of the patient. Additional information like a diagnostic orientation or the pregnancy status can also be indicated.
At any moment, the Save values button cannot be used if any of the required fields is not filled in.
Change information[edit]
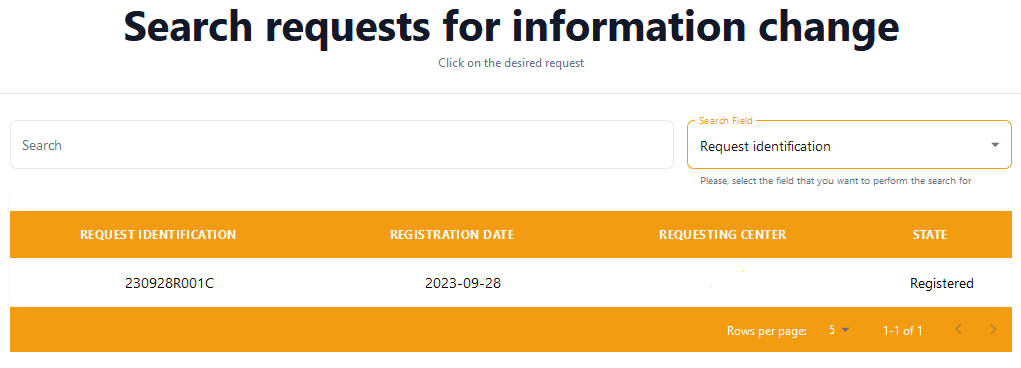
This form is for editing requests whose samples were not yet delivered. Clicking on any part of the row will bring the laboratory technician to a form similar to the create one, with all of its tabs and similar format and behavior.
Deliver samples[edit]
Similarly to the previous form, this also displays a list of either Registered or Processing requests, for the laboratory technician to choose one of them.
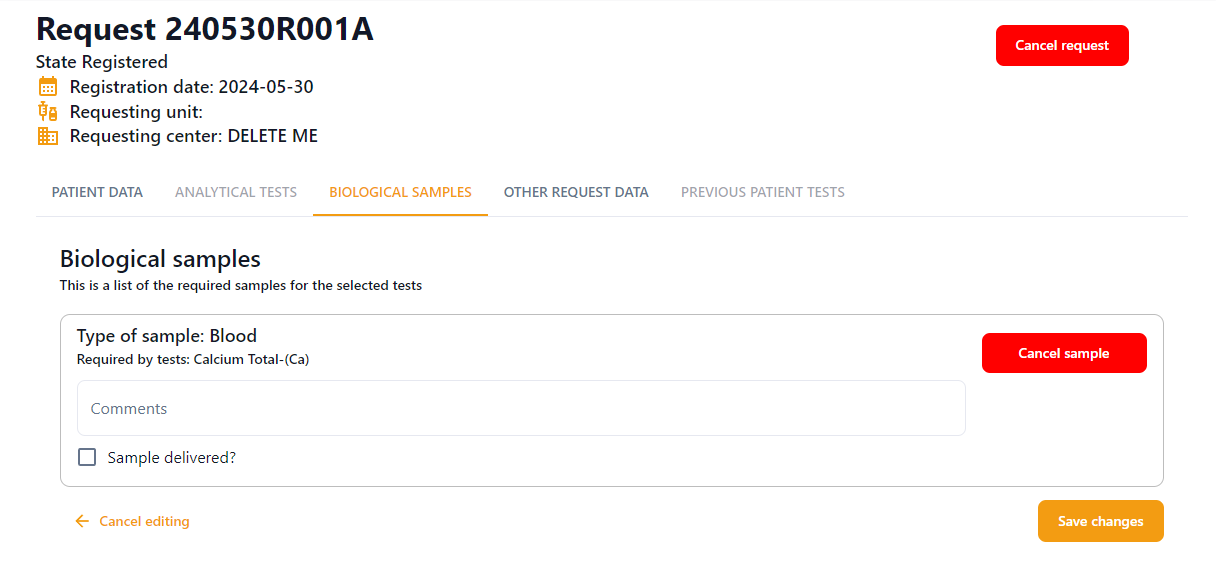
Once a request is chosen, five tabs are shown. The patient's data, potentially analytical tests already done in this request, its list of biological samples, the request data, and tests in previous requests. Just the biological samples allows some interaction. The other ones are read-only (if enabled at all).
Each of the samples shown contains a field to provide comments, and it can be either checked as delivered or cancelled by click the corresponding red button. On the delivering of a sample, its origin or incident can be optionally provided. On cancelling, a pop-up dialogue allows, providing some justification for this.
It is important to notice that the tests associated to the request cannot be changed once the first sample as been delivered.
Introduce results[edit]
As in the previous cases, a list of requests is shown. In this case, this list contains all requests in Processing state. Clicking the corresponding button at the bottom, it is possible to download a worklist with all pending tests in these requests, to work on them off-line.
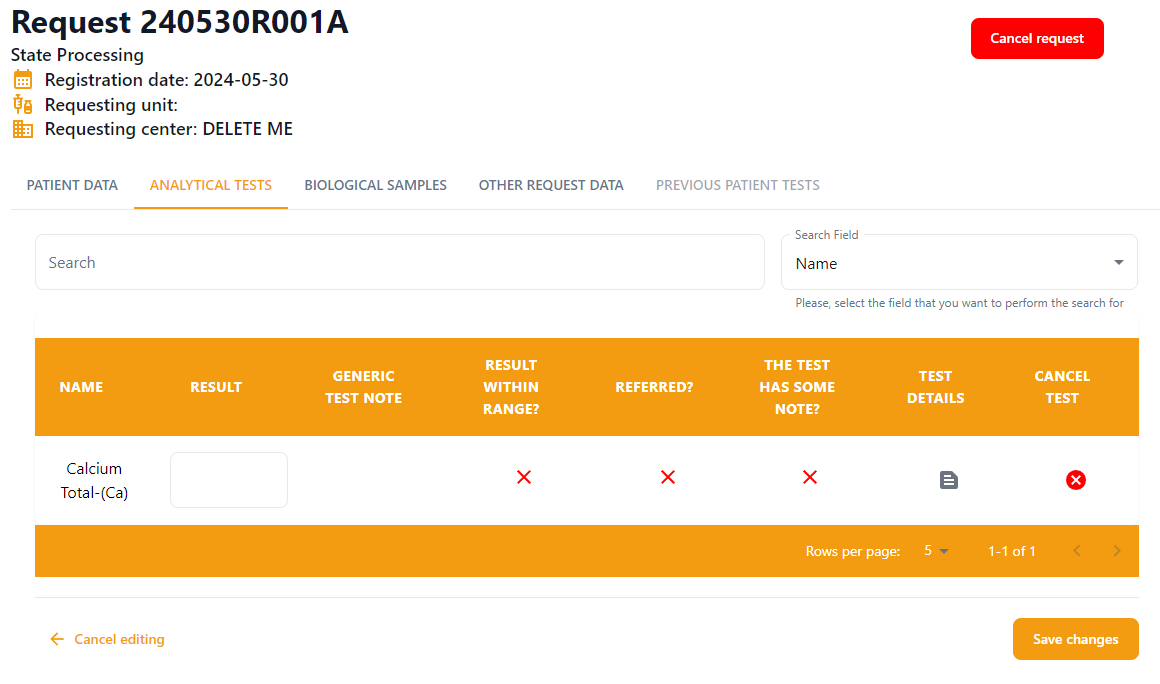
Once the laboratory technician has chosen a request, five tabs are shown with the patient's data, its list of analytical tests, its list of biological samples, other request data, and potentially previous tests of the same patient. Just the analytical tests allows some interaction. The other ones are read-only. Besides the same search box present in all the tables in the system, there is also the possibility of filtering the tests by group of tests (if any was chosen for this request). A red button in the top right corner allows cancelling the request.
The table of tests contains the following columns:
- Name → Shows the name and the code of the kind of test. It is coloured red if either the test or its sample was cancelled.
- Result → Allows to introduce the result of the test.
- Generic test note → Shows the informative note associated to the kind of test, if any.
- Result within range → Indicates whether the result of the test is in the expected range of values for the kind of test (green check) or not (red cross).
- Referred → Indicates whether the test is done or expected to be done in another laboratory (green check) or not (red cross).
- Automatic (not visible by default) → Indicates whether the test is done or expected to be done automatically (green check) or not (red cross). Automatic tests are done by means of the Robotized microscope and the Mobile App. Their results should not be typed manually, but uploaded through Bluetooth. This feature is enabled through the corresponding system parameter. If enabled, the field is editable here to allow overwriting the automatic results.
- The test has some note → Indicates whether the test has some associated note (green check) or not (red cross).
- Test details → This should show an icon to navigate to further details of the test. However, if the test or its corresponding sample was cancelled, the corresponding message in red will be shown.
- Cancel test → Icon to cancel the test. If the test is cancelled. A red cancelled label appears.
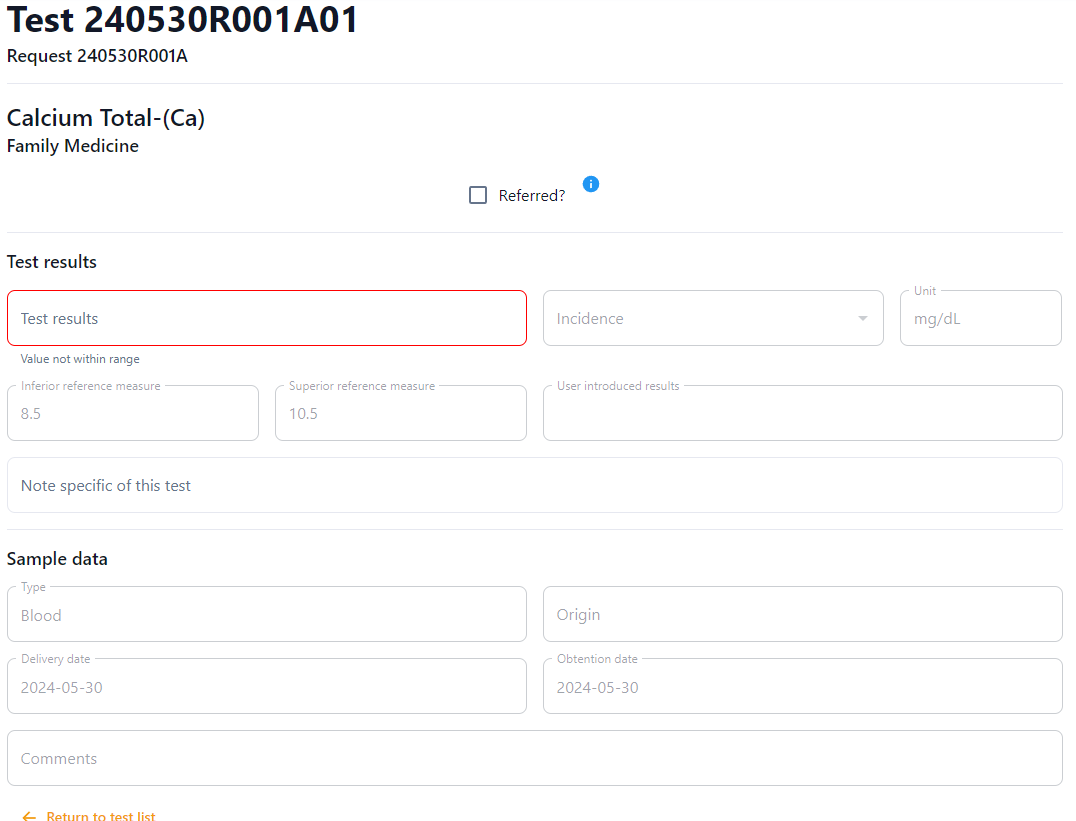
On the laboratory technician accessing the details of the test, we gain access to visualize many other things (i.e., units of the result, inferior reference measure, superior reference measure, the user who introduced the results, as well as details provided for the corresponding sample on delivering it). Moreover, this also allows changing if the test is automatic or deferred, indicate some incidence on the sample, or provide some note (notice that the content of this note will be visible to the patient in the report of the request). It is important to notice that any of the information provided in this form will not be persisted in the disk until back in the list and saved from there.
If the result of the test was provided automatically (which is not enabled by default and only available in the context of the IMAGING project), the corresponding image and its associated note will be shown at the bottom of the details of the test.
Validate results[edit]
This functionality, available only to the laboratory supervisor or a laboratory technician authorized to validate, uses exactly the same interface as introducing results, but the table shows one more column, Validated, with a checkbox for each test. These can be checked one by one, or all at once, by choosing a concrete group of tests in the dropbox at the top. On doing the latter, a button to check all the tests of the group will appear.
Besides doing it in the list, the results can be overwritten and the test validated from the details of the test. Together with displaying all the information related to the test in read-only mode, the corresponding form also offers the possibility of adding a note to the test, as well as changing whether the test is automatic/referred or not, cancelling the test or the whole request.
It is important to notice that the tests will not be really validated until the bottom right button is pressed to save the changes.
Search historic[edit]
This functionality, available to both laboratory technician and supervisor allows to see any request in the history of the laboratory. They can be filtered out by the state and the date of the request. By clicking on the corresponding row, all the details of the request can be visualized.
At the bottom left of this form, there are two download buttons. Clicking any of them will generate and download the corresponding file (i.e., CSV or ZIP). The checkboxes in the Downloaded fields tab indicate which fields will be included in each of these files. Moreover, the ZIP file is password protected. The password used is indicated by the system parameter zip_password, whose value can be seen and modified from Parameters tab. Additionally, the field separator and decimal characters used in the CSV file can also be configured in the same tab.
