WiFi Connection: Difference between revisions
| Line 41: | Line 41: | ||
##In the file explorer window, navigate to the following location: C:\Windows\System32\drivers\etc | ##In the file explorer window, navigate to the following location: C:\Windows\System32\drivers\etc | ||
##Change the file type dropdown menu to "All Files" to make sure you can see the hosts file. | ##Change the file type dropdown menu to "All Files" to make sure you can see the hosts file. | ||
##Select the file named "hosts" and click "Open. | ##Select the file named "hosts" and click "Open". | ||
#Edit the Hosts File: | #Edit the Hosts File: | ||
##The hosts file will open in Notepad. | ##The hosts file will open in Notepad. | ||
Revision as of 17:01, 19 April 2024

ARIS allows other devices in the same network as the laptop/PC acting as server (i.e., the one where it was installed, and actually running the application) to connect to the system and work concurrently. However, ARIS executes by default on “localhost” (i.e., the server itself, which is a way to access services or resources on your own machine without going over the network), and thus not allowing other devices to connect (even if they are in the same network). Hence, this should be properly reconfigured to the right URL (or IP address).
Running ARIS on network URL[edit]
In order to be able to connect multiple devices on the same network to use ARIS simultaneously, you will need to:
- Look for the IP address (the unique number that identifies where the device is located in the network) of the server executing ARIS. Note that this IP address must be the one of the active network where both the server and the other devices MUST connect. To find out which is the IP address of the server, you should:
- Open Settings: Click on the Start menu (Windows icon) located at the bottom-left corner of your screen. Then click on the gear icon labeled "Settings" to open the Windows Settings menu.
- Navigate to Network & Internet Settings: In the Windows Settings menu, click on the "Network & Internet" option. This will take you to settings related to your network connections.
- View Network Status: In the Network & Internet settings, you'll see various options on the left side. Click on "Status". This will show you an overview of your network status.
- Change Adapter Options: Under the "Status" section, find and click on the "Change adapter options" link. This will open a window displaying all the network adapters available on your computer.
- Find Active Network Connection: In the Network Connections window, you'll see a list of network adapters. Identify the available network connection (one from these three in the following example: Ethernet, Wi-Fi or Local Area Connection - a.k.a. HotSpot) where ARIS needs to run. Note that the chosen network MUST be also available for the other devices to connect too (i.e., visible from those devices). Right-click on the active network connection and select "Status" from the context menu (right button in the mause or touch pad).

Network Connections example - Check Connection Status: In the Status window for your network connection, click on the "Details" button. This will open a new window displaying detailed information about your network connection.
- Find IP Address: In the Network Connection Details window, look for the "IPv4 Address" field. This field will display your active IP address.
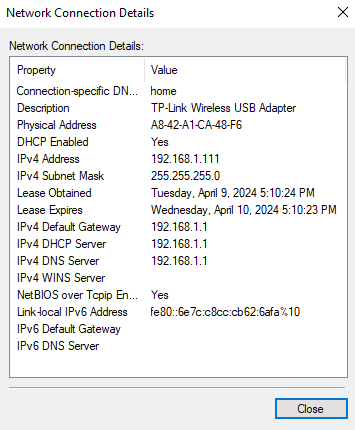
Network Connection details example - Note Down the IP Address: Take note of the IP address displayed next to "IPv4 Address." This is the active IP address of your PC in the network.
- Copy this IP address in the ARIS\Frontend\build\server_ip.txt file:
- Navigate to 'C:\Users\Public folder and find the ARIS\Frontend\build\server_ip.txt' file.
- Copy the selected IP address to this file, removing the previous content.
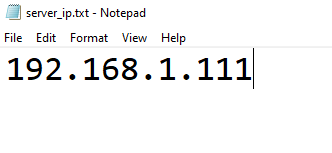
Editing server_ip.txt - Save the changes and close the file.


Now, the next time ARIS starts, it will run in the desired URL.

Hence, you can type the URL (192.168.1.111:3000 in the example) in a browser of this or any other device connected to the same network and access ARIS concurrently. In this example, the selected network to run ARIS was "MiFibra-842E” (Wi-Fi). So all devices connected to this network, can thus access the application as in the server.
Setting custom name for ARIS URL – hosts file[edit]
Furthermore, only for HotSpot connections (Wi-Fi and Ethernet connections will not be able to run the application with the custom name), there is the option the set a name instead of the numeric IP address so it can be easier to remember. For this purpose, we must edit the Windows hosts file:
- Open Notepad as an Administrator:
- Click on the Start menu (Windows icon) located at the bottom-left corner of your screen.
- Type "Notepad" into the search bar.
- Right-click on Notepad in the search results.
- Select "Run as administrator" from the context menu. If prompted for permission, click "Yes."
- Open the Hosts File:
- In Notepad, click on "File" in the top-left corner.
- Choose "Open."
- In the file explorer window, navigate to the following location: C:\Windows\System32\drivers\etc
- Change the file type dropdown menu to "All Files" to make sure you can see the hosts file.
- Select the file named "hosts" and click "Open".
- Edit the Hosts File:
- The hosts file will open in Notepad.
- You'll see some comments at the beginning of the file, denoted by a "#" symbol.
- To add an entry, go to the end of the file on a new line.
- Enter the IP address you want to assign (such as "192.168.137.1") followed by a space and then the domain name you want to map to that IP address. For example: 192.168.137.1 aris

Editing hosts file
- Save the Changes:
- After making your changes, click on "File" in the top-left corner.
- Choose "Save" to save the changes to the hosts file.
- Close Notepad:
- Close Notepad once you've saved the changes.

After this steps, you must set the ARIS/Frontend/build/server_ip.txt with the same name as in the hosts file, instead of the IP address, as explained in the previous section.

Once you start ARIS, it will run on the “aris” domain as set before. Accessing this domain in the browser of the devices connected to the HotSpot will samely run the application.
