Patients
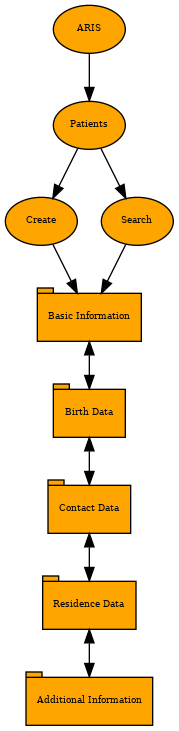
Create
This form is divided into steps. The step the user is on is marked by the number of the step turning orange.

Once the step is filled with the required information, the circle marking the step will stay orange and the number in said circle will change into a check mark (✓) ![]()
- Basic information of the patient → The first step involves the obligatory entry of the name, last mane and gender of the patient, as indicated by the asterisk,
 . Further information is optional. To continue to the next step, the user must press the next button found at the bottom right of the form.
 - Birth information → To complete this step, only the birthdate is required. To input this information, the user has two options. They can fill in the information with the format given, or they can click on the little calendar icon,
 , and select the correct date. Once this information is filled in, the box next to it will automatically be filled by the patient's current age.
 - Contact information → One phone number must be assigned to a patient for further contact.
- Residency information → This step has no required fields.
- Extra information → This step has no required fields. The Reserved 1, 2 and 3 are boxes that can be modified through the System administration if the laboratory requires any specific information from the patients.
The next button cannot be used if any of the required fields are not filled in. In every step, apart from step 1, there is a Previous button for the user to be able to navigate back and forth between steps and alter the information they contain.
Search
There is a search bar at the top of this page. A patient can be searched for by name, phone, Health facility ID, creation date or last modification date. To choose one of these, the user must click on the downwards arrow found on the search field box and pick the desired field. Once the field is chosen, the user can insert the information corresponding to the search field in the box on the left.

| Name | Phone | Health Facility ID | Creation Date | Last Modification Date | Patient details | Edit Patient |
|---|---|---|---|---|---|---|
| The first column shows the patient's name | The patient's contact number is listed in this column | Here, their identification number for the hospital where they are treated can be found | This column informs the user about when the patient's information was first inputted into the app | The last time the patient's information was altered in the app is shown here | This column displays the following icon, |
This column displays the following icon, File:Editpatient.PNG. This button allows the user to edit a patient through a page similar to the create patients page. The main differences are found at the bottom of the page, where there is a cancel editing button on the left and a save changes button on the right |
Arrows appear next to each heading in the table when the mouse is hovered over them to manipulate the order the information is showed in for each heading.
Duplicate Detection
The e-mail address, as well as the clinical history identify a patient. Moreover, patients of similar name, age and telephone number are detected as potential duplicates at creation time. On happening, a warning is displayed, and the user can either modify the corresponding data or move ahead with the creation.
A VIDEO NEEDS TO BE ADDED HERE!!!